●VMware Playerのインストール
VMware Playerの最新版は、http://www.vmware.com/jp/download/player/からダウンロード出来ます。
VMware Playerをインストールします。
●QEMUのインストール
QEMUをインストールします。
●仮想ディスクのイメージファイル(.vmdk)の作成
仮想ディスクのイメージファイルは、QEMUのディスクイメージユーティリティ「qemu-img」で作成できます。qemu-imgコマンドで.vmdkファイルを作成する場合、以下の書式を実行します。
●仮想マシンの設定ファイル(.vmx)の作成
以下を参考にしてください。
あとは、DVD-ROM(またはCD-ROM)を挿入して、VMwareを起動すれば自動的にDVD-ROMから起動します。
●VMWare Player上のWindowsにCtrl+Alt+Delを送信するには
VMware上のWindowsにCtrl+Alt+Delを送信するには、Ctrl+Alt+Insで代替できます。
●VMWare Player上のWindowsで日本語キーボードに対応させるには
Windows XPでPS/2接続のMicrosoft日本語キーボードを使用すると、デバイスマネージャの一覧に101/102配列の英語キーボードとして表示される場合があるを参照してください。
それでも半角/全角キーでの日本語入力ON/OFF切り替えは出来ないので、その対応についてはVNC経由のVMwareで日本語入力を切り替える方法を参照してください。
●VMWare Kernel Modules Updater
以下のようなウィンドウが起動する場合があります。
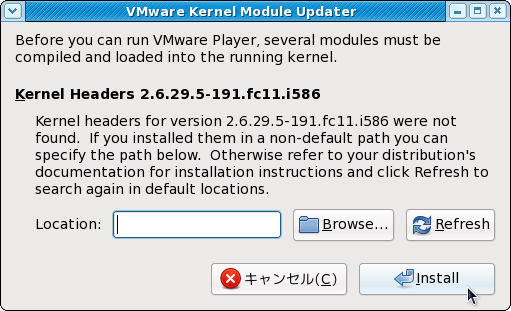
この場合は、「kernel-devel-2.6.29.5-191.fc11.i586.rpm」をインストール後、「Browse」をクリックし該当バージョンのカーネルを選択します。
●カーネル2.6.29でVMware Playerが動作しない
Fedora 11にアップグレード後、VMware Playerを2.5.2にバージョンアップしたところ動作しなくなってしまいました。
最初は.rpmを使用してバージョンアップ後、VMware Playerを起動させると「unable to build kernel module」と言うエラーが表示され起動することができませんでした。
次に、.bundleを使用してバージョンアップしたところ下記のようなエラーが出力されました。
http://communities.vmware.com/servlet/JiveServlet/download/1213985-20879/vmware-modules-2.6.29-portable.patch
また、ここからも。
試してみると
パッチ適用作業を自動化するシェルスクリプトを作成したので下に貼り付けます(管理者権限で実行する必要があります)。
[任意]ファイル名: vmware-modules-updater-2.6.29.sh ライセンス: CC0
●カーネル2.6.29でVMware Playerが動作しない(その2)
VMware Playerを2.5.2をインストールしたところ動作しなくなってしまいました。VMware Playerを起動させると「unable to build kernel module」と言うエラーが表示され起動することができませんでした。
その対処方法を以下に記載します。
検索するとvmware-modules-2.6.29-portable.patchを発見。このパッチを適用した修正ファイルを置いておきます。
vmware-modules-kernel2.6.9.patch.zip中の*.tarを/usr/lib/vmware/modules/source/にコピーして
その後、VMware Playerの起動が可能になります。
VMware Playerの最新版は、http://www.vmware.com/jp/download/player/からダウンロード出来ます。
VMware Playerをインストールします。
# rpm -ivh VMware-Player-2.5.0-118166.i386.rpm
●QEMUのインストール
QEMUをインストールします。
# yum install qemu
●仮想ディスクのイメージファイル(.vmdk)の作成
仮想ディスクのイメージファイルは、QEMUのディスクイメージユーティリティ「qemu-img」で作成できます。qemu-imgコマンドで.vmdkファイルを作成する場合、以下の書式を実行します。
$ qemu-img create -f vmdk <ディスクイメージ> <サイズ>例えば、10Gbytesのwinxp.vmdkという仮想ディスクを作成する場合は、下記のとおりとなります。
$ qemu-img create -f vmdk winxp.vmdk 10G上記では「10Gbytes」と指定したにもかかわらず、作成されたファイルのサイズが数Gbytesとなっています。仮想ディスクのサイズは、仮想マシンを実行してOSをインストールするなどして実際に使用されるファイルなどが増えていくと、それに伴って増えていくことになります。
●仮想マシンの設定ファイル(.vmx)の作成
以下を参考にしてください。
#!/usr/bin/vmware .encoding = "UTF-8" config.version = "8" virtualHW.version = "3" displayName = "Windows XP" # ----- Virtual HDD image ----- ide0:0.present = "true" ide0:0.fileName = "WinXP.vmdk" # ----- CD-ROM Drive ----- ide1:0.present = "true" ide1:0.fileName = "auto detect" ide1:0.deviceType = "atapi-cdrom" # ----- FDD ----- floppy0.present = "false" # ----- Network ----- ethernet0.present = "true" ethernet0.connectionType = "nat" # ----- Select Guest OS ----- # guestOS = "winnetstandard" # Windows Server 2003 standard Edition guestOS = "winxppro" # Windows XP Professional # guestOS = "winxphome" # Windows XP Home # guestOS = "win2000pro" # Windows 2000 Professional # guestOS = "win95" # Windows 95 # guestOS = "win98" # Windows 98/98SE # guestOS = "winme" # Windows Me # guestOS = "winnt" # Windows NT # guestOS = "winvista" # Windows Vista # guestOS = "winvista-64" # Windows Vista x64 Edition # guestOS = "redhat" # Red Hat Linux (generic) # guestOS = "rhel4" # Red Hat Enterprise Linux 4 # guestOS = "rhel4-64" # Red Hat Enterprise Linux 4 64-bit # guestOS = "suse" # SuSE Linux (generic) # guestOS = "sles" # SUSE Linux Enterprise Server (generic) # guestOS = "turbolinux" # Turbo Linux (generic) # guestOS = "ubuntu" # Ubuntu (generic) # guestOS = "other24xlinux" # Other Linux 2.4.x kernel # guestOS = "other26xlinux" # Other Linux 2.6.x kernel # guestOS = "other26xlinux-64" # Other Linux 2.6.x kernel 64-bit # guestOS = "otherlinux" # Other Linux # guestOS = "netware6" # Netware6 # guestOS = "solaris9" # Solaris9 # guestOS = "solaris10" # Solaris10 # guestOS = "solaris10-64" # Solaris10 64-bit # guestOS = "freebsd" # FreeBSD (generic) # guestOS = "dos" # MS-DOS # guestOS = "other" # Others # ----- Sound ----- sound.present = "true" sound.virtualDev = "es1371" sound.autoDetect = "true" sound.fileName = "-1" # ----- Memory size for guest OS ----- memsize = "768" extendedConfigFile = "WinXP.vmxf" ide1:0.autodetect = "TRUE" floppy0.fileName = "/dev/fd0" usb.present = "TRUE" virtualHW.productCompatibility = "hosted" tools.upgrade.policy = "manual" ethernet0.addressType = "generated" uuid.location = "56 4d ca 8c fd 15 ac 4f-cb ff 46 b0 94 87 93 9e" uuid.bios = "56 4d ca 8c fd 15 ac 4f-cb ff 46 b0 94 87 93 9e" ide0:0.redo = "" vmotion.checkpointFBSize = "16777216" ethernet0.generatedAddress = "00:0c:29:87:93:9e" ethernet0.generatedAddressOffset = "0" # ----- Video ----- #svga.maxWidth = "1024" #svga.maxHeight = "768" checkpoint.vmState = ""また、「VMware Player用の仮想マシンを作成するには」にWebサイトの仮想マシン作成機能の方法が記載されています。
あとは、DVD-ROM(またはCD-ROM)を挿入して、VMwareを起動すれば自動的にDVD-ROMから起動します。
●VMWare Player上のWindowsにCtrl+Alt+Delを送信するには
VMware上のWindowsにCtrl+Alt+Delを送信するには、Ctrl+Alt+Insで代替できます。
●VMWare Player上のWindowsで日本語キーボードに対応させるには
Windows XPでPS/2接続のMicrosoft日本語キーボードを使用すると、デバイスマネージャの一覧に101/102配列の英語キーボードとして表示される場合があるを参照してください。
それでも半角/全角キーでの日本語入力ON/OFF切り替えは出来ないので、その対応についてはVNC経由のVMwareで日本語入力を切り替える方法を参照してください。
●VMWare Kernel Modules Updater
以下のようなウィンドウが起動する場合があります。
この場合は、「kernel-devel-2.6.29.5-191.fc11.i586.rpm」をインストール後、「Browse」をクリックし該当バージョンのカーネルを選択します。
●カーネル2.6.29でVMware Playerが動作しない
Fedora 11にアップグレード後、VMware Playerを2.5.2にバージョンアップしたところ動作しなくなってしまいました。
最初は.rpmを使用してバージョンアップ後、VMware Playerを起動させると「unable to build kernel module」と言うエラーが表示され起動することができませんでした。
次に、.bundleを使用してバージョンアップしたところ下記のようなエラーが出力されました。
Using 2.6.x kernel build system.
make: ディレクトリ `/tmp/vmware-root/modules/vmmon-only' に入ります
make -C /lib/modules/2.6.29.1-desktop-4mnb/build/include/.. SUBDIRS=$PWD SRCROOT=$PWD/. modules
make[1]: ディレクトリ `/usr/src/linux-2.6.29.1-desktop-4mnb' に入ります
  CC [M]  /tmp/vmware-root/modules/vmmon-only/linux/driver.o
In file included from /tmp/vmware-root/modules/vmmon-only/linux/driver.c:31:
/tmp/vmware-root/modules/vmmon-only/./include/compat_wait.h:78: \
                            error: conflicting types for ‘poll_initwait’
include/linux/poll.h:67: error: previous declaration of ‘poll_initwait’ was here
/tmp/vmware-root/modules/vmmon-only/linux/driver.c: In function ‘LinuxDriverSyncCallOnEachCPU’:
/tmp/vmware-root/modules/vmmon-only/linux/driver.c:1423: error: \
                            too many arguments to function ‘smp_call_function’
/tmp/vmware-root/modules/vmmon-only/linux/driver.c: In function ‘LinuxDriver_Ioctl’:
/tmp/vmware-root/modules/vmmon-only/linux/driver.c:1987: error: \
                            ‘struct task_struct’ has no member named ‘euid’
/tmp/vmware-root/modules/vmmon-only/linux/driver.c:1987: error: \
                            ‘struct task_struct’ has no member named ‘uid’
/tmp/vmware-root/modules/vmmon-only/linux/driver.c:1988: error: \
                            ‘struct task_struct’ has no member named ‘fsuid’
/tmp/vmware-root/modules/vmmon-only/linux/driver.c:1988: error: \
                            ‘struct task_struct’ has no member named ‘uid’
/tmp/vmware-root/modules/vmmon-only/linux/driver.c:1989: error: \
                            ‘struct task_struct’ has no member named ‘egid’
/tmp/vmware-root/modules/vmmon-only/linux/driver.c:1989: error: \
                            ‘struct task_struct’ has no member named ‘gid’
/tmp/vmware-root/modules/vmmon-only/linux/driver.c:1990: error:
                            ‘struct task_struct’ has no member named ‘fsgid’
/tmp/vmware-root/modules/vmmon-only/linux/driver.c:1990: error:
                            ‘struct task_struct’ has no member named ‘gid’
/tmp/vmware-root/modules/vmmon-only/linux/driver.c:2007: error: \
                            too many arguments to function ‘smp_call_function’
make[1]: ディレクトリ `/usr/src/linux-2.6.29.1-desktop-4mnb' から出ます
make: ディレクトリ `/tmp/vmware-root/modules/vmmon-only' から出ます
make[2]: *** [/tmp/vmware-root/modules/vmmon-only/linux/driver.o] エラー 1
make[1]: *** [_module_/tmp/vmware-root/modules/vmmon-only] エラー 2
make: *** [vmmon.ko] エラー 2
modinfo: could not find module vmmon
インターネットで調べたところ、既にパッチが出ていて、以下からダウンロードできます。
http://communities.vmware.com/servlet/JiveServlet/download/1213985-20879/vmware-modules-2.6.29-portable.patch
また、ここからも。
試してみると
$ patch -p1 < vmware-modules-2.6.29-portable.patch
patching file vmblock-only/Makefile
Hunk #1 succeeded at 122 (offset 9 lines).
patching file vmci-only/Makefile
Hunk #1 succeeded at 122 (offset 9 lines).
patching file vmmon-only/include/x86apic.h
Hunk #1 FAILED at 94.
1 out of 1 hunk FAILED -- saving rejects to file vmmon-only/include/x86apic.h.rej
patching file vmmon-only/linux/driver.c
patching file vmmon-only/linux/hostif.c
Hunk #1 succeeded at 3424 (offset 1 line).
Hunk #2 succeeded at 3538 (offset 1 line).
Hunk #3 succeeded at 3662 (offset 1 line).
patching file vmmon-only/Makefile
Hunk #1 succeeded at 122 (offset 9 lines).
patching file vmnet-only/Makefile
Hunk #1 succeeded at 122 (offset 9 lines).
patching file vmnet-only/netif.c
patching file vsock-only/Makefile
Hunk #1 succeeded at 122 (offset 9 lines).
となり、1箇所だけ適用できない部分があったものの
$ grep APIC_BASE_MSR -r *-only
vmmon-only/include/x86apic.h.rej:  #define APIC_BASE_MSR         0x1b
vmmon-only/include/x86apic.h.rej:  #define APIC_BASE_MSR         0x1b
vmmon-only/include/x86apic.h.rej:+ #define APIC_BASE_MSR         0x800
モジュールのソースにこの値を使用したところはないため、影響はないと思われます。
パッチ適用作業を自動化するシェルスクリプトを作成したので下に貼り付けます(管理者権限で実行する必要があります)。
[任意]ファイル名: vmware-modules-updater-2.6.29.sh ライセンス: CC0
#! /bin/sh
# vmware-modules-updater-2.6.29.sh
# CC0
PATH=/bin:/usr/bin
MODULEDIR=/usr/lib/vmware/modules/source/
MODULES="vmblock vmci vmmon vmnet vsock"
PATCH_URL="http://communities.vmware.com/servlet/JiveServlet \
                /download/1213985-20879/vmware-modules-2.6.29-portable.patch"
cd /tmp/
WORKDIR=$(mktemp -d vmware-modules-updater-2.6.29-XXXXXXXXXX)
cd ${WORKDIR}/
for MOD in ${MODULES}; do
  tar xf ${MODULEDIR}/${MOD}.tar
done
if ! wget -O patch ${PATCH_URL}; then
  echo "Error: cannot download patch" >&2
  rm /tmp/${WORKDIR} -fr
  exit 1
fi
ls
patch -p1 < patch
for MOD in ${MODULES}; do
  tar cf ${MOD}.tar ${MOD}-only
  mv ${MODULEDIR}/${MOD}.tar{,.old}
done
mv *.tar ${MODULEDIR}/
rm /tmp/${WORKDIR} -fr
echo "Update succeeded"
パッチ適用後、問題なく起動するようになりました。
●カーネル2.6.29でVMware Playerが動作しない(その2)
VMware Playerを2.5.2をインストールしたところ動作しなくなってしまいました。VMware Playerを起動させると「unable to build kernel module」と言うエラーが表示され起動することができませんでした。
その対処方法を以下に記載します。
検索するとvmware-modules-2.6.29-portable.patchを発見。このパッチを適用した修正ファイルを置いておきます。
vmware-modules-kernel2.6.9.patch.zip中の*.tarを/usr/lib/vmware/modules/source/にコピーして
# vmware-modconfig --console --install-all警告が出まくるけど気にしない。
その後、VMware Playerの起動が可能になります。